Mindset Map

The Mindset Map was developed as a customizable check-in tool that helps individuals and groups define and connect with their unique Optimum Mindset for Learning. You decide what your Optimum Mindset feelings are, and then identify high- and low-energy feelings that pull you away from your Optimum Mindset.
Designed by Brooke Borg MFA of CIS
The Why and How
As a check-in tool, the Mindset Map can be a ritual to start the day as a reminder of our learning goals or be used at specific times when Optimum Mindset appears to be absent from a learning environment.
The Mindset Map is designed to help you gain an understanding of how you (and your students) want to feel while learning and explore that next to what else is being felt in a particular moment. It can also help identify the type of self-regulating activity you might need – e.g. an energizer vs. a moment of mindfulness – so we can access our Optimum Mindset.
This tool is based on the fact human beings have the ability to feel and express a broad range of emotions, often more than one at a time. It is also rooted in the principle that simply naming our feelings can unlock our ability to manage those feelings or shift towards other more desirable feelings.
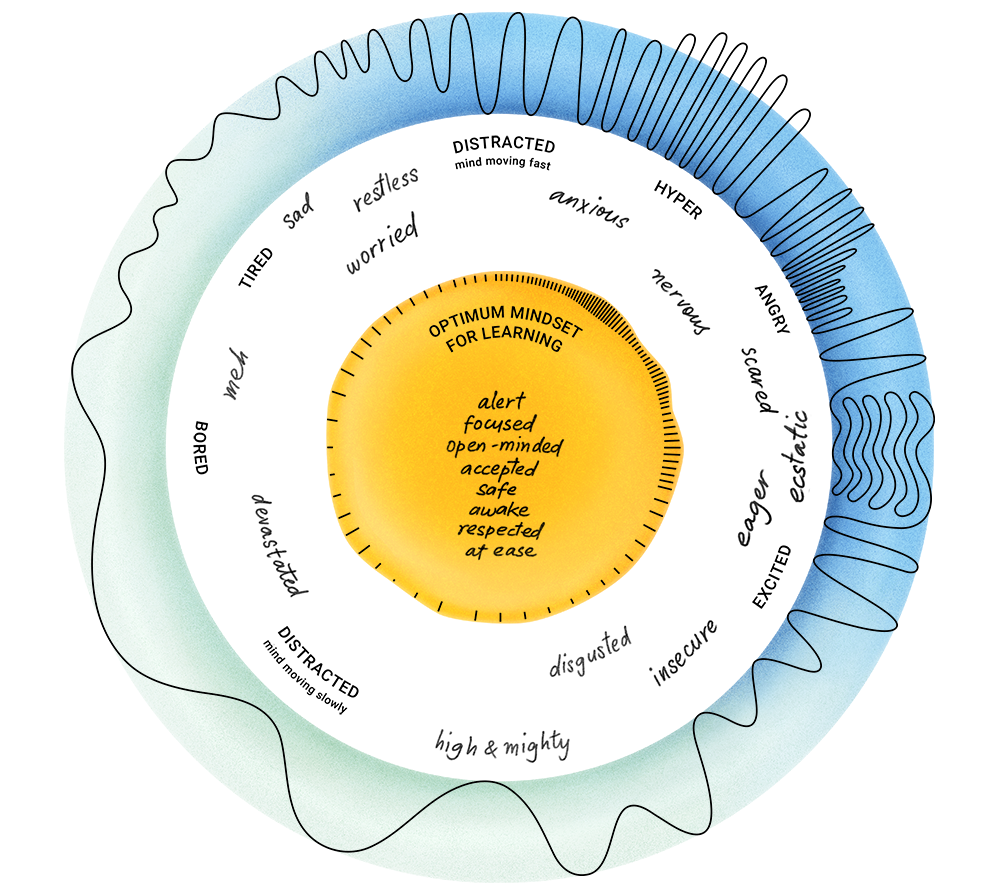
Example Mindset Map
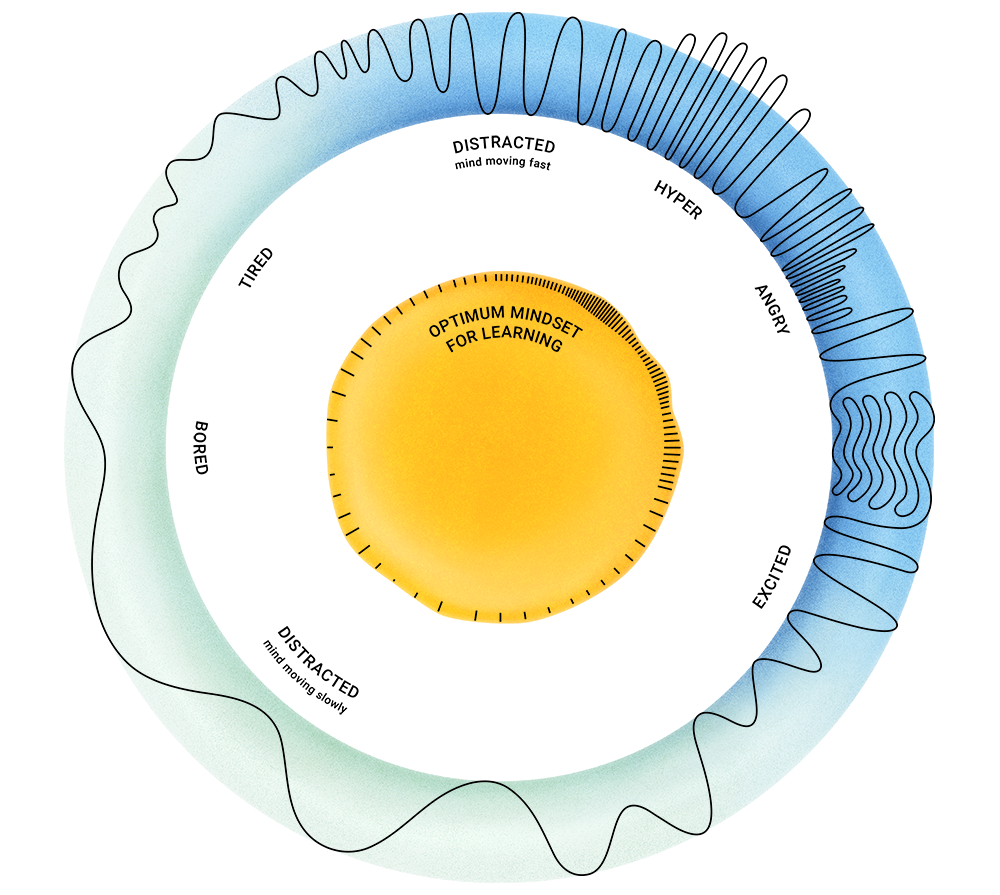
Notice the movement of the line around the circle; it represents the pace of thoughts and/or heart rate when feeling different emotions. The Mindset Map displays both high-energy and low-energy feelings that pull us away from Optimum Mindset.

PRO TIPS
- Using colloquial words or current slang to describe feelings–e.g. scatter-brained, blah, whatevs–personalizes the tool and can help people feel more represented and invested.
- Hang your filled-in map prominently in class and set aside time to ask students to place themselves within the map. You can also refresh words and phrases periodically.
Build Your Own Mindset Map
Notice the movement of the line around the circle; imagine it represents the pace of your thoughts and/or heart rate when feeling different emotions. What emotions do the lines represent to you? Read the words lined up with the peaks and waves. Do they match? Are there other feelings that pull you away from Optimum Mindset? Add them to the circle:

Step-by-Step
Here are a few more details about the different parts of the Mindset Map and how to think about and use them.
IDENTIFY YOUR OPTIMUM MINDSET
Ask yourself or your class how you want to feel when you are in the classroom? What feelings and energy make it easiest for you to learn? Is it calm, alert, revved up?
What would make you feel comfortable asking a question or sharing your thoughts?
Fill in these answers in the yellow circle in the middle of the Mindset Map; this can be done individually or as a whole class activity.
High and low energy feelings
Fill in the right side with high energy feelings that may not be optimum for learning, and fill in the left side with the low energy feelings that are not optimum for learning.
Remember that even positive, welcomed emotions, if they are very high energy, can take us away from our optimum mindset for learning. For example, if you or your student are elated about something, it can be easy to get restless or distracted.
Check-In with your Mindset
Check-in with how you are feeling. Acknowledge your feeling on the map and honor it with a moment of self-regulation to bring you and your students back to Optimum Mindset.
Depending on where you place yourself on the Mindset Map, consider whether an energizing or a calming activity feels appropriate. Perhaps a physical activity to drain off emotion will help you shift. Or, perhaps a breathing exercise will energize and uplift you.
CHOOSE A SELF-REGULATING ACTIVITY
On the following pages, you'll find a handful of breathing, writing, and physical activities designed for self-regulation–and there are countless others!
You can also book time with one of our CIS counselors to learn more about ways to use the Mindset Map for yourself and your students.
Breathing
FLOWER/CANDLE
- Breathe in through your nose as though you’re smelling a flower for a count of 4.
- Exhale through your mouth like you’re blowing out a candle for a count of 6.
- Repeat 3 more times.
* you can also close your eyes as you inhale, and open them on exhale.
BELLY BALLOON
- Close your eyes. Place hands on your belly. Breathe in deeply through your nose. Imagine a balloon filling your belly.
- Breathe out slowly through your mouth, making a “shhh” sound.
- Repeat the above sequence 5 times.
- When you’re ready, squeeze your own arms and shoulders, giving yourself a hug and transition slowly to eyes open.
Writing
WHAT IS REAL RIGHT NOW?
- Grab a pen or pencil and paper; you can also use just your mind if you prefer.
- Ask yourself “What is real right now?”
- e.g. the grout in my tile; the hum of the fan; the cookies in the oven
- When subjective things come up–i.e. feelings, opinions, stories– transform them into objective statements that only express what is factual and real.
- Subjective: My child, as always, left laundry for me to fold... no respect!
- Objective: I asked Tom to fold his laundry; the laundry is still unfolded.
RIGHT NOW I’M AWARE OF…
- Make a list of 5 things that you are aware of that you can see.
- Next, write 5 things you are aware of that you can hear. Then write 5 things you can smell, taste, and/or feel.
- Repeat the above steps except write only 4 things you are aware of for each sense. And again writing 3 things, then 2 things, and finally just one thing you are aware of for each sense.
- Take a moment to breathe deeply and let all the generated awareness sink in.
Physical
STRETCH IN ALL DIRECTIONS
- Stand with feet comfortably lined up under your hips, a hand width apart.
- Breathe in through your nose while opening your arms up overhead. Exhale and bend forward as far as you can at the hips, keep your spine straight while diving with arms out like wings.
- Breathe in through the nose, bringing just your head up to look forward. Exhale back down.
- Breathe in through the nose once more, extend your hands outward and up overhead as you lift up to stand. Exhale your hands down by your side.
- Repeat the above movement sequence two more times.
- Now, stand with your feet a little wider than your hips. Lift your right arm only. Bend to the left, then slowly rotate your torso to the front and then to the back.
- Lift your left arm to meet your right overhead, palms facing each other, and stretch upward. Lower your right arm and slowly stretch to your right side.
- Come up slowly and lower your left arm. Repeat in the other direction starting with left arm up and leaning to the right.
TENSE and EASE
- Jump or run in place for 10 seconds.
- Quickly crouch down on your feet in a ball, tensing every muscle in your body: clenching fists, face, stomach muscles, arms, squeezing your legs together, etc.
- When you can tense no further, come back up to standing.
- Lift your left foot off the ground and right arm overhead. Stretch right arm up while standing only on your right leg.
- Breathe in deeply.
- When you exhale, quickly crouch down again in a ball on the ground, tensing every muscle as hard as you can and letting out the air in your lungs. Squeeze your fists, legs, abdomen, etc.
- Stand up this time lifting your right foot off the ground and left arm overhead.
- Breathe in and elongate your body.
- Come back to standing on both feet with your arms at your side.
- Shake out your hands and shoulders.
- Inhale, exhale, smile.